Setting up your p2p.Ninja node on Windows involves three broad steps:
- Installing the p2p.Ninja extension on your web browser. This serves to redirect all URL requests for .p2p superdomain to your p2p.Ninja Gateway.
- Downloading the p2p.Ninja Software onto your 64x Windows system and running the file p2p.ninja.exe.
- Optionally, running the p2p.Ninja server on your p2p.Ninja router so that you may host a website on the network.
The following instructions are for version 6.0 and are general in nature.
Things you will need: 1) A desktop or computer with internet access and a (Firefox or Chrome) web-browser installed. Ideally, your device will have at least two network interfaces. for example, it might have a WiFi network interface that you use to access internet. And it may also have an Ethernet port that you are currently not using at all. 2) A managed switch that supports 'router-on-a-stick' configuration. 3) Interconnecting your p2p.Ninja node to others in the vicinity requires additional hardware - typically Ethernet cables or alternatively a wireless connection device (see complementary technologies).
I. Installing the p2p.Ninja extension!
For the Chrome web-browser, download the extension for Chrome browser from the Chrome Web app store. For the Firefox web-browser you may install the p2p.Ninja extension from the Firefox website. Both these extensions are also available to you for installation in the 'developer' mode of your respective browsers. See the downloads section.
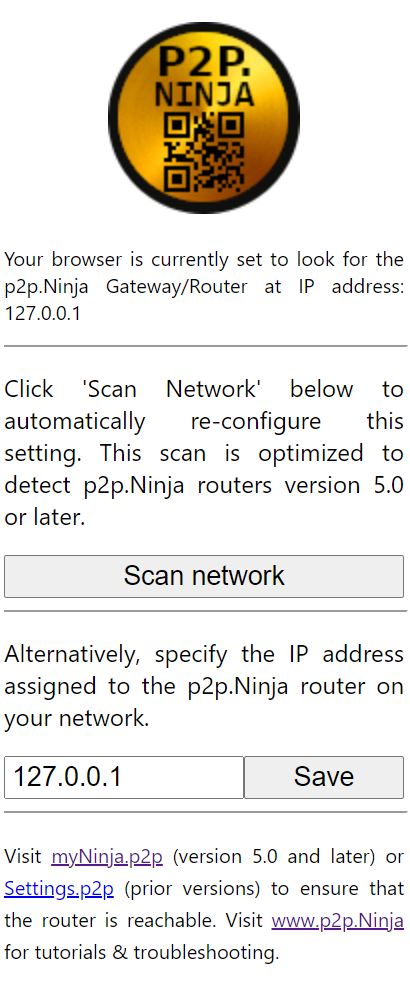
Below is a screen shot of the p2p.Ninja extension for the chrome browser. Note the IP address 127.0.0.1 that is specified by the user. This will need to be the same IP address that is later selected in the p2p.Ninja software row 2 later on (see below).
II. Setting up the your desktop to run the p2p.Ninja software:
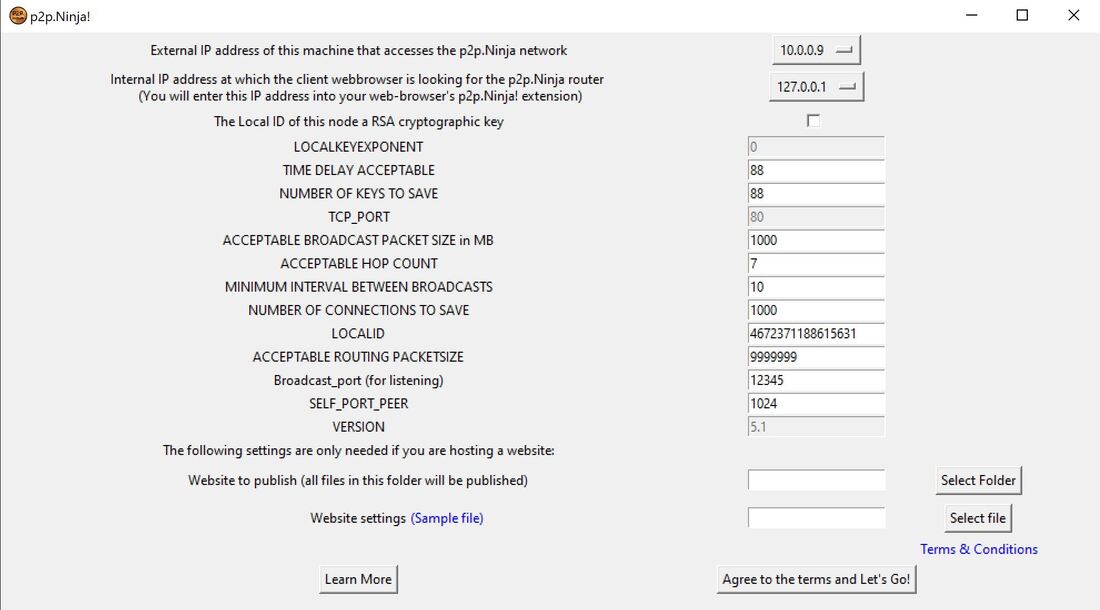
Download version 6.0 of the p2p.Ninja software intended for 64x Windows operating system. browse to the file named p2p.ninja.exe and double click. Allow access through any firewall you may have installed on your system. You will see a dialog box pop up as below:
To get started, most people will only need to make good selections in the first two options provided in this dialog box. The IP address in the first row is the IP address of your Ethernet port of your computer. Typically, this would not be the port that you use to access regular internet.
In the second row, you can select any IP address from the drop down menu. You would enter the same exact IP address in your p2p.Ninja extension in your web-browser (see the chrome extension screen-shot above).
Select 'Agree to the terms and Let's Go!' to proceed.
In the second row, you can select any IP address from the drop down menu. You would enter the same exact IP address in your p2p.Ninja extension in your web-browser (see the chrome extension screen-shot above).
Select 'Agree to the terms and Let's Go!' to proceed.
Accessing the p2p.Ninja network for the first time!
At this stage a command line interface should open up. After initialization, it should direct you to visit http://myNinja.p2p from your web browser. Please proceed and visit http://myNinja.p2p . If the setup has worked well thus far, your webpage should load without any problems.
At this stage a command line interface should open up. After initialization, it should direct you to visit http://myNinja.p2p from your web browser. Please proceed and visit http://myNinja.p2p . If the setup has worked well thus far, your webpage should load without any problems.
III. Hosting a website from your p2p.Ninja router:
If you desire to host a peer-to-peer website from your computer, you will need to restart the p2p.Ninja software and also specify the last two rows of the dialog box that opened in step II above.
Sample settings file is accessible from within the software. Note that the sample settings file for windows version of the p2p.Ninja software is different from before. The web address at which your website is published is specified by the settings file you choose. When editing the web address in the settings file, prefix the web address with '~'. Also, change the Are_we_a_public_key value to '0' (from '1' ).
Sample website is also provided, but can be any folder in your computer that you choose to publish.
For advanced users:
You may choose to use an RSA public key address for your website. 43F (in the sample settings.txt file provided) is in fact a public key (representing the number 3233). However, p2p.Ninja is recreational at this time and its implementation of public key cryptography is not reliably secure against divulging of private keys. Therefore, do not use keys longer than 50 bits (while understanding that they may possibly be duplicated or stolen due to implementation weaknesses). To convert your public key into a corresponding .p2p address, you can enter it into the myNinja.p2p page (where it says Key value (Give a positive integer) ). When you enter your web address into your settings file, do not prefix it with '~' (as was described above). Also, leave the Are_we_a_public_key value at '1'.
IV. Interconnection with local computers:
Now that your p2p.Ninja node is up and running, you can connect to other devices in your local area via Ethernet cable and switches. This will form a p2p.Ninja network that is scale-able and totally decentralized. We recommend using a 'router-on-a-stick' Ethernet switch to connect to multiple peers.
If your friend or family have followed the above steps on their Raspberry pi or Windows machine, they should be able to access your website from their web-browser. And you should be able to access theirs. Have fun!


