|
|
Instructions for the Windows version are provided separately. Setting up your p2p.Ninja node on a Raspberry Pi involves three broad steps:
|
Interconnecting your p2p.Ninja node to others in the vicinity requires additional hardware - typically a managed switch and Ethernet cables. The following instructions are for version 5.0 and are general in nature. Since version 5.0, detailed instructions are included in the downladed software package. Look for the file named INSTRUCTIONS_README.txt
Things you will need: 1) A desktop or computer with internet access and a (Firefox or Chrome) web-browser installed. 2) A Raspberry Pi-3 or Pi-4 (with associated micro SD card and cables).
Installing the p2p.Ninja extension!
For the Chrome web-browser, download the extension for Chrome browser from the Chrome Web app store. For the Firefox web-browser you may install the p2p.Ninja extension from the Firefox website. Both these extensions are also available to you for installation in the 'developer' mode of your respective browsers. See the downloads section.
Setting up the your micro SD card for use in Raspberry Pi (3 or 4):
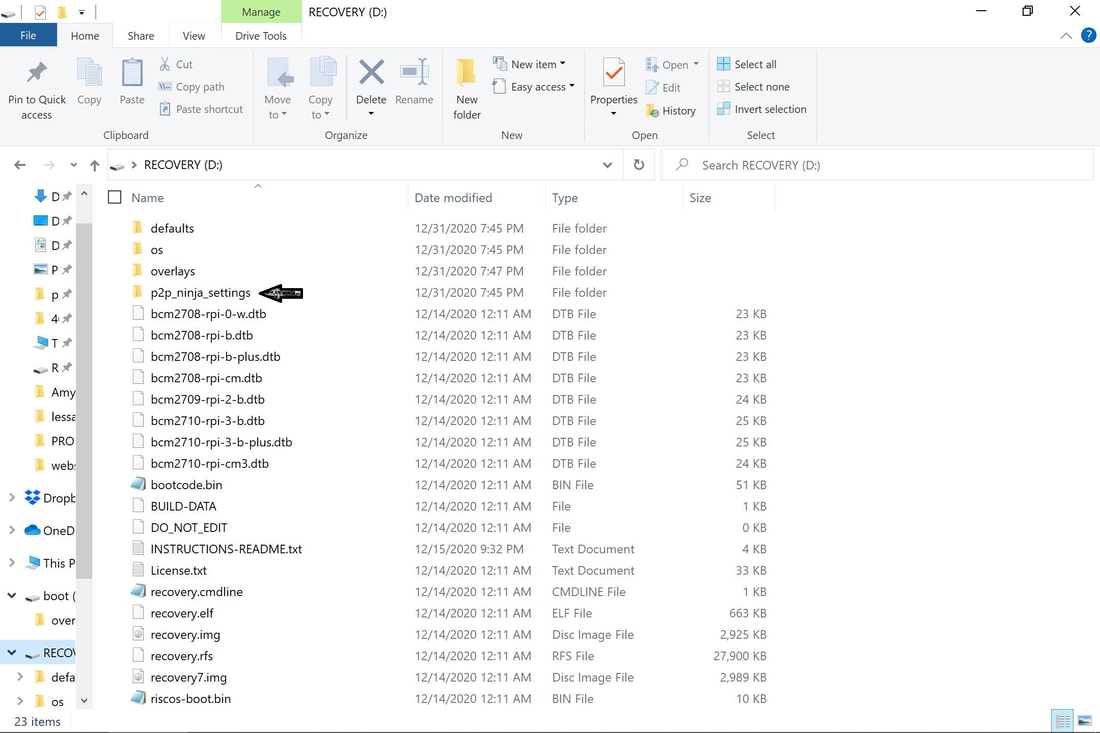
Use your Desktop computer to format an SD card between 4 to 8 GB entirely in the FAT32 format. Now extract all the files from p2p.Ninja!_v5.0_plug_N_play.zip (see the Downloads section) to the root directory of your SD card. The screen shot below indicates how the SD card should look after you have extracted all the files from the download into its root folder. Notice that my SD card labelled NEW VOLUME (E:). All the files extracted from the downloaded p2p.Ninja!_v4.1_plug_N_play.zip have been directly copied to the SD card without creating a new folder to hold them.
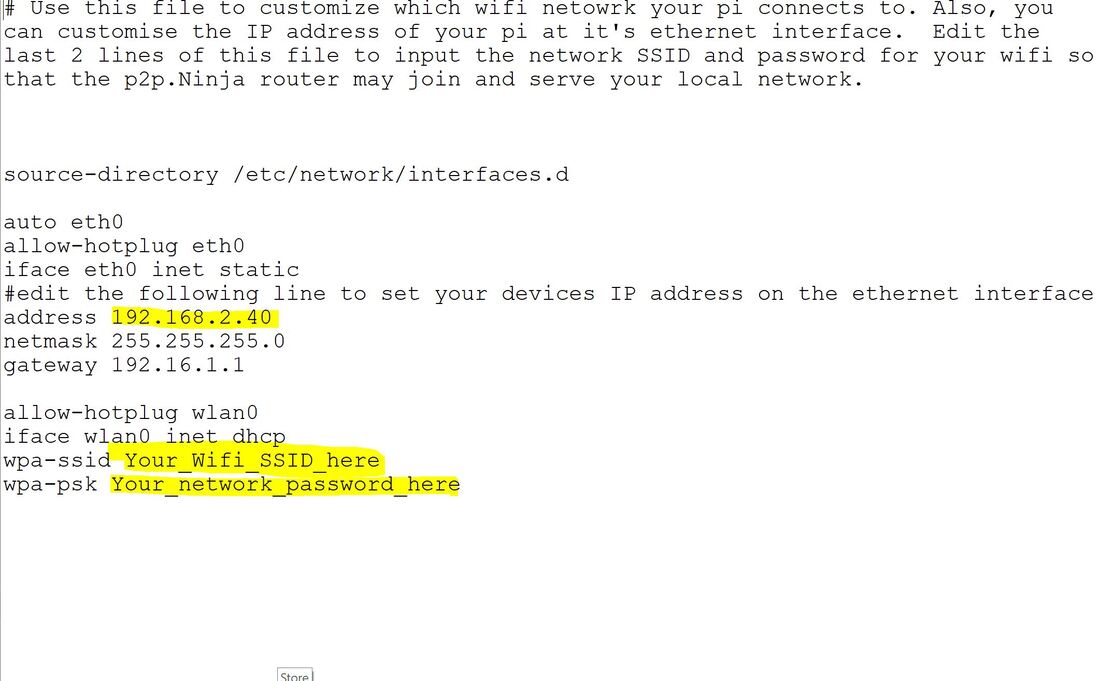
Navigate into the folder named p2p_ninja_settings. Open the file wifi_config with a text editor of your choice. Choose an IP address in the range 192.168.2.(1-254) that will be distinct from your peers; Also, input the SSID of your wifi and password as shown below.:
Setting up your Raspberry Pi to act as a p2p.Ninja! router:
Eject the SD card that you prepared above from your desktop and plug it into the raspberry pi and turn it on. The latest versions (since 4.0) of the p2p.Ninja software is plug-N-play! Installation is automatic. Times vary according to your SD card speeds. About 20 minutes of installation time is typical, but up to 40 minutes may be needed on some cards. The p2p.Ninja software automatically reboots the Pi after installation and starts working! Do not turn off the Pi once you have turned it on with the SD card inside. If you have any problem with the installation, kindly reach out to us.
Eject the SD card that you prepared above from your desktop and plug it into the raspberry pi and turn it on. The latest versions (since 4.0) of the p2p.Ninja software is plug-N-play! Installation is automatic. Times vary according to your SD card speeds. About 20 minutes of installation time is typical, but up to 40 minutes may be needed on some cards. The p2p.Ninja software automatically reboots the Pi after installation and starts working! Do not turn off the Pi once you have turned it on with the SD card inside. If you have any problem with the installation, kindly reach out to us.
Accessing the p2p.Ninja network for the first time!
Now let us return to the web-browser (with the p2p.Ninja extension installed already) on your desktop computer. Our latest chrome extension lets you scan your local Wifi and automatically connects to the p2p.Ninja router that you just started up! Visit http://myNinja.p2p from your browser to change the default password (p2p.Ninja) of your p2p.Ninja router. At this time, connect the ethernet port of your raspberry pi with the ethernet port of another raspberry device running the p2p.Ninja software. If somebody is hosting a .p2p website (see below on how you may do so) on their pi, you should be able to access it by typing the web-address into your browser.
Now let us return to the web-browser (with the p2p.Ninja extension installed already) on your desktop computer. Our latest chrome extension lets you scan your local Wifi and automatically connects to the p2p.Ninja router that you just started up! Visit http://myNinja.p2p from your browser to change the default password (p2p.Ninja) of your p2p.Ninja router. At this time, connect the ethernet port of your raspberry pi with the ethernet port of another raspberry device running the p2p.Ninja software. If somebody is hosting a .p2p website (see below on how you may do so) on their pi, you should be able to access it by typing the web-address into your browser.
Hosting a website from your p2p.Ninja router:
Browse to http://myNinja.p2p and scroll down to the server section of the page. Enter the password (default password is p2p.Ninja ) to start the server function of your p2p.Ninja node. Your installation is pre-built with a sample website (accessible at http://43F.p2p). You may also upload a custom website to your p2p.Ninja node and start broadcasting it. Sample settings and website files are provided. Use these as templates to make your own website and upload it into your p2p.Ninja node. The preferred mode of editing this website would be to eject the microSD card from the pi and upload your website in the /p2p_ninja_settings/website folder of the recovery partition of the microSD card. The web address can be changed by editing the file /p2p_ninja_settings/myServerSettings. When editing the web address in the settings file, prefix the web address with '~'. Also, change the Are_we_a_public_key value to '0' (from '1' ). If your friend or family have followed the above steps on their Raspberry pi, they should be able to access your website from their web-browser. And you should be able to access theirs. Have fun!
For advanced users:
You may choose to use an RSA public key address for your website. 43F (in the sample settings.txt file provided) is in fact a public key (representing the number 3233). However, p2p.Ninja is recreational at this time and its implementation of public key cryptography is not secure against divulging of private keys. Therefore, do not use keys longer than 50 bits (while understanding that they may possibly be duplicated or stolen due to implementation weaknesses). To convert your public key into a corresponding .p2p address, you can enter it into the myNinja.p2p page (where it says Key value (Give a positive integer) ). When you enter your web address into the settings.txt file, do not prefix it with '~' (as was described above). Also, leave the Are_we_a_public_key value at '1'.


